Scratch is the simplest and easiest way to start programming your Marty, if you’re new to programming. The interface lets you graphically build up a program from blocks.
Scratch needs to connect to Marty over your WiFi network to send instructions, so Marty must be on your WiFi network. If you haven’t already, then check out the WiFi setup guide
When you open Scratch, it’ll try and find Martys on your network. Have a look at the Scratch getting started guide for details on how that works.
It’s also worth checking out the Intro to Marty Behaviour article for details on how Marty behaves and reacts. But in brief
Get Ready block (which will also move Marty to the zero position), or the Enable motors block.This section will give details on each block available through the Scratch interface.
| Action Blocks | Sensor Blocks | Marty Selector |
|---|---|---|
| Circle dance | Accelerometer | Select Marty |
| Enable motors | Battery Voltage | Select Marty on IP |
| Eyes | Input | |
| Get Ready | Motor current | |
| Kick | TODO: motor position | |
| Lean | TODO: motor enabled | |
| Lift leg | ||
| Lower leg | ||
| Move joint | ||
| Move leg forward/backward | ||
| Play sound | ||
| Set blocking mode | ||
| Side Step | ||
| Stand straight | ||
| Stop | ||
| Turn | ||
| Turn off motors | ||
| Walk | ||
| Walk backward | ||
| Walk forward | ||
| Wiggle |

Circle dance will make Marty lean right->forward->left->backward, or left->backward->right->forward, depending on the setting. His head will therefore move round in a clockwise or anticlockwise direction.
The time is for a complete cycle.
The movement will end with Marty leaning either forward or backward, so you can send several circle dance commands in a row to produce a continuous motion

Enable motors will activate Marty’s motors so they’re ready to receive commands, but won’t send any movement commands.
Enable motors will also un-pause any queued movements, so if you’ve previously used the stop and pause block, you can use enable motors to resume movement.

The Eyes block will let you move Marty’s eyebrows near-instantly to a predefined position - either angry, normal, excited, or wide

The Get ready block is designed to get Marty’s motors activated and finish with all joints in their zero positions. It’ll also wiggle the eyebrows, so you know that it’s done something even if Marty was already standing straight.
It will enable motors
It’s a good idea to call this at the beginning of a script, to make sure Marty’s joints are enabled and in a known position.
When Marty’s motors have been deactivated, he has no way to tell where they are. So when you call Get ready Marty may move very quickly and jerk a bit. Keep fingers clear!

Kick will make a kicking movement with Marty’s right or left legs.
TODO: Add time and twist parameters for extended interface

Lean will make Marty lean forward, backward, left or right, in the given number of seconds.
Forwards and backwards will move Marty’s hip joints together, while left and right will move Marty’s knee joints.

Lift leg will move either Marty’s left or right knee outward to lift that leg up. This might make Marty tilt sideways, depending on his current position

Lower leg will measure which of the two knees is higher up, and then lower it to the same angle as the lower knee. This will have the effect of lowering a raised leg to the ground.
This function currently doesn’t take into account hip angles, so you might get unexpected behaviour if the hip angles don’t have the same magnitude.

Move joint will move a single one of Marty’s joints to a specified angle in a specified time.
The angle is given as a percentage of max for that joint.
By default queuing up move joint blocks will make the movements happen sequentially, one after the other. If you want to tell multiple joints to move simultaneously, you can disable blocking using the set blocking mode block.

The Move leg block will move either the left or right leg forwards or backwards, by moving the hip joint.
Note that forward or backward is relative to Marty - so moving a leg backwards can move the rest of Marty forwards!

This block will make Marty’s buzzer make a noise. It takes three parameters, the starting frequency, end frequency, and the duration. The frequency of the output will be linearly moved between the start and end frequencies, so you can make chirps. You can also set the start frequency and end frequency to be the same to generate single tones.
Marty will queue up multiple sound commands, so you can send whole tunes across to be played.
The play sound block will return straight away (it won’t pause operation while the sound is played).

The Set blocking mode block affects the operation of all other movement blocks.
By default, blocking is enabled - and that means that a movement block (like a walk or move joint block) will take the same time to execute as the movement takes. So if you say to lean left in two seconds, that block will take two seconds to finish, before the next block is executed.
However, if blocking is disabled, movement commands will be sent to Marty, but operation will continue immediately.
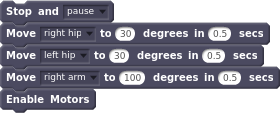
This is most useful if you want to combine movements. For example, if you had three move joint blocks in a row like this:

With blocking enabled, Marty would move the right hip, then the left hip, then the arm. With blocking disabled, Marty would move all three joints near simultaneously.
If timing is really really critical, you might want to pause operation, queue up some movements on Marty, and then set them all off at the same time, like this:
That’ll avoid any slight timing differences due to network lag.

Side step will make Marty take a specified number of side steps to the left or right.
It defaults to a direction of left, a step time of 1.5s and a step length of length of 50.
For more information on the step parameters see the walk function.

Stand straight will return all of Marty’s joints (including the eyes and the arms) to their zero positions.
It’ll move them simultaneously over 2 seconds.

Stop will let you stop or pause the movements of a Marty. It’s especially useful in non-blocking mode
There are several options types of stop:
| Stop type | Effect |
|---|---|
| finish move | Clear movement queue only (so finish the current step/wiggle/movement) |
| freeze | Clear movement queue and servo queues (freeze where you are) |
| disable motors | Clear everything and disable motors |
| return to zero | Clear everything, and make robot return to zero |
| pause | Pause, but keep servo and movequeue intact and motors enabled |
| pause and disable motors | As pause, but disable motors too |

Turn will make Marty turn on the spot in the left or right direction. For faster turning try using the walk block to set your own parameters

The Turn off motors block will disable all of Marty’s servos. That’ll make them moveable by hand, and you’ll need to re-enable them with an enable motors or Get ready block before they’ll move again

The walk block lets you set specific parameters for walking.
The step length is a percentage of maximum, from -100 to +100. Negative step sizes will make Marty walk backwards.
Turn is also a percentage of maximum.
Step time is in seconds, down to a minimum of 0.5s.

This block will make Marty take a specified number of steps backwards. It defaults to a step length of -40 and a step time of 1.8 seconds.

This block will make Marty take a specified number of steps forwards. It defaults to a step length of 40 and a step time of 1.8 seconds.

This’ll make Marty wiggle.

The accelerometer block lets you read from Marty’s three axis accelerometer. This can tell you information about acceleration, but also about tilt.
There are three axes:
| Axis | Marty dimension |
|---|---|
| Z-axis | Vertical |
| Y-axis | |
| X-axis |
Each axis will give a number representing the acceleration in that direction, but will also show the direction gravity is pulling. That’s because accelerometers are basically little weights attached to springs, and while acceleration causes the weights to move, so does gravity.
When Marty is standing straight and not moving, the Z-axis should read around 1.0.
The Z-axis of the accelerometer is also used for fall detection.
To measure tilt, you could try doing something like this:

That’ll set tilt to around 0 normally, going up to 100 if Marty is horizontal. You could also use the X and/or Y axis to measure tilt in a particular direction

This block will tell you Marty’s battery voltage, which can be pretty useful to let you know when you should recharge.
It gives back the actual voltage. About 8.4 is fully charged, and 7.4 is getting low.

The input block reads one of Marty’s GPIO channels.
For example, you can connect a bump switch to one of the channels, and the input block will return with a 1 if it’s pressed, or a 0 otherwise.
The ports are labelled on Marty’s control board, and bump switches connect up the same way as the motors do, with the white cable at the top
So, to wait until a switch connected to port 0 is pressed you could do:


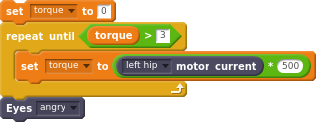
The motor current block lets you read the electrical current going through one of the motors. That gives an estimate of the force on the motor.
It’s normally a very small number, so it might be easier to multiply it. To react to somebody pressing Marty’s arm, you could do this:

When the Marty scanner detects more than one Marty on the network, this block will give you the option to pick which Marty you’d like to control.
Note - you need to double click the block to run it, or run it as part of a chain of blocks, before it will work!

If the Marty scanner doesn’t detect your Marty (or even if it does), you can select a Marty by IP.
Again, you’ll need to run the block by double clicking it or having it a chain of blocks, for it to have effect